TYPES OF LINES:
1) Out Lines:
These are the most common lines used in Drawings. Lines drawn to represent visible edges, corners and surface boundaries of objects are called as Outlines (or) Principle lines. They are continues thick and solid lines.
2) Margin Lines:
These lines are continues thick and wide lines along which the points are trimmed.
3) Dimension Lines and extension Lines:
Dimension lines are thin, solid lines. These lines show the direction, length, and limits of the dimensions of a part. Dimension lines are drawn with an arrowhead at both ends. They are terminated at the outer ends by pointed arrowheads touching the outlines, extension lines or centre lines. A single style of arrowhead should be used throughout the drawing.
Extension lines are also continues thin lines. Extension lines are drawn close to, but never touching, the edges or surface they limit. These are extended by about 3 mm beyond the dimension line, length of extension lines is generally suited to the number of dimensions they limit. They should be perpendicular, or at right angles, to the dimension line.
4) Construction lines:
These lines are used for constructing figures. These are shown in geometrical drawings only. These are continues thin light lines.
5) Hatching or section lines: Section lines, also known as hatch patterns, indicate the surfaces in a sectional view as they would appear if the part were actually cut along the cutting plane line. These are continues thin lines that are normally drawn at 45-degree angle to the main outline of the section. They are uniformly spaced about 1 mm to 2 mm apart.
Leader lines is drawn to connect dimensional notes, material specifications, and process notes with the feature to which it applies. It is a continues thin, solid line with an arrowhead at one end. These are bent (or) angled at the start, but should always end horizontal at the notation. When leader lines reference a surface, a dot is used instead of an arrowhead.
7) Border Lines:
Perfectly rectangular workspace is determined by drawing the border lines. These are continues thin lines.
8) Break Lines:
Break lines are drawn to show that a part has been shortened to reduce its size on the drawing. In general two variations of break lines in engineering drawing, they are the long break line and the short break lines.
Long break lines are thin ruled lines with short zigzags within them to indicate a break.
Short break lines are continues thick, wavy solid lines that are drawn freehand. They are drawn to show a short break, or irregular boundaries.
When either of these break lines is used to shorten an object, you can assume that the section removed from the part is identical to the portions shown on either side of the break.
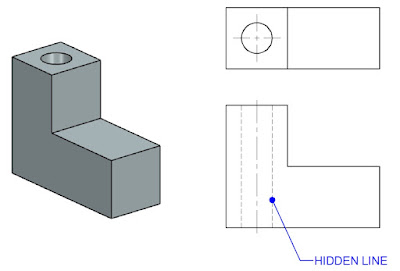
9) Hidden (or) Dotted Lines: Hidden lines are used to show edges and surfaces that are not visible in a view. These are also called as Dotted lines. These lines are drawn as thin, evenly spaced dashes ( 2 mm spaced and equal distances of 1 mm apart). A surface or edge that is shown in one view with an object line will be shown in another view with a hidden line. When a hidden line meets or intersects another hidden line or an outline, their point of intersection or meeting should be clearly shown.
These lines are drawn to indicate the axes of cylindrical, conical or spherical objects or details, and also used to show the centre lines of circles and arcs. They are thin, long, chain lines composed of alternatively long and dot spaced approximately 1 mm apart. Centre lines should extend for a short distance beyond the outlines to which they refer. Centre lines can also show the symmetry of an object. The point of intersection of the two centre lines must always be indicated.
11) Cutting plane lines:The location of the cutting plane is shown by this line. This is long, thin, chain line, thick at ends only.
12) Chain Thick:
These lines are used to indicate special treatment of the surface.


No comments:
Post a Comment